Written By: Akinola Ayomide
Edited and reviewed by: Owolabi Olutola
Solana programs can be written in C, C++ and Rust programming language. These programs are similar to smart contracts in Ethereum. C and C++ are low-level languages because many computer low-level operations like memory management are not done automatically, but they are much faster than high-level languages like Python, Javascript, PHP and so on, which take care of low-level operations automatically. On the other hand, Rust is a low-level language that gives the feel of a high-level language. Rust automatically takes care of low-level operations, but also exposes these low-level operations to developers. This makes Rust language fast, powerful, and easy to write.
This article is part of a series and in the article series, I will introduce some basic concept of Rust programming that is needed to successfully write a solana program. For this article I will address the following:
Installing Rust and Cargo
Writing your first Rust program
Rust common programming concepts
Installing Rust and Cargo
We need to have Rust installed on our machine to run Rust code. To install Rust, follow this installation documentation.
Once you are done with the installation, type this in your terminal
rustc --version
This prints out the Rust compiler version installed.
Rust, like many other low-level languages, has to be compiled to machine language before running. Rustc is responsible for that.
Cargo, rust equivalent to Javascript's NPM and PHP's Composer is also installed when you install Rust. Apart from package (also know as crate) management, cargo is used to improve Rust development flow, such as compiling and running code with a single command and setting up a new Rust project with a standard folder structure.
To confirm Cargo was installed on your machine run,
cargo --version
This should print out the cargo version installed.
Write your first Rust program
To get started, open your terminal to the folder you want your program to be. Then create a new program using this command
cargo new my_first_program
This should print this
Created binary (application) `my_first_program` package
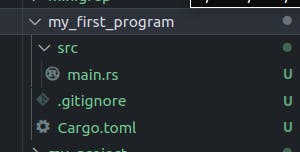
You will see a new folder named "my_first_program" created in your present folder. Open the "my_first_program" folder in your favourite code editor. For me, I use VSCode, here is the content of my folder,

The file "Cargo.toml" is similar to package.json in Javascript or composer.json in PHP. It is used to manage rust dependecies in your program.
[package]
name = "my_first_program"
version = "0.1.0"
edition = "2021"

# See more keys and their definitions at https://doc.rust-lang.org/cargo/reference/manifest.html

[dependencies]
Inside the "src" folder, you have "main.rs" file. Rust files end with .rs extension. This main.rs is the entrypoint of the program, similar to index.js in Javascript. It contains a function "main",
fn main() {
    println!("Hello, world!");
}
"fn" is used to define a function in Rust, and "printIn!" marco is similar to console.log() in Javascript or print() in python.
Now that you have your first program setup, let's run it. Open your teminal and make sure it is on your program directory, then run
cargo run
This command will compile your code then run it. The output should be similar to this
 Compiling my_first_program v0.1.0 (/home/dray/www/Rust/my_first_program)
    Finished dev [unoptimized + debuginfo] target(s) in 1.25s
     Running `target/debug/my_first_program`
Hello, world!
Or you can also try it out on this interactive code editor.
Congratulations! You just built your first Rust program. To build a complex Rust program, you will need to understand how to use variables, functions and other programming concepts in Rust.
Rust common programming concepts
Like every programming language, Rust makes use of common programming concepts like:
Variables
Constant
Function
Loops
Control flow
Let's explore each concepts
Variables
Variables in Rust are defined with the "let" keyword. For example
let x = 4;

let y = "hello world";
In Rust, there are two types of variable datatype. Scalar and compound datatypes.
Scalar datatypes
Scalar datatypes are datatypes that holds just a single value. Here are some Rust scalar datatype:
- Intergers Integers are numbers that can either be positive or negative. Unsigned integers can only take positive values (so no need of adding + or - sign, because they will always be positive), while signed interger can take both negative and positive values. Integers are also represented by the range of number they can store. For example, a signed 8-bit number can store numbers from -128 to 127 (check here to learn how to make the calculation). Here are some examples of integers in rust
// The default number datatype is u32 (unsigned 32-bit integer)
let my_number = 23;

// signed 32-bit
let signed_number:i32 = -34;

// unsigned 8-bit
let x:u8 = 49;

// signed 8-bit
let y:i8 = -34;
- Floating point number
This datatype holds decimal numbers. It has two types based its bit length, 32-bit (f32) and 64-bit (f64). f64 is the default in rust.
// default is f64
let my_float = 35.41;

// float with f32
let my_other_float:f32 = 23.4;
- Boolean Boolean are true or false values.
let my_bool = false

let my_other_boolean:bool = true
- String
This datatype is use for storing string values. It used double quotes around its content
let my_string = "My rust program"
- Characters
These datatypes are used to store letters and characters, such as alphabets, emojis, Japanese aphabets and so on. It uses single quotes around its content
let my_char = 'Ƶ'

let love_emoji = '❤️'
Compound datatypes
These are datatypes that holds multiple values into one type. They are of two primitive types, tuples, and arrays.
- Tuples
Tuples hold multiple datatypes into one. It has a fixed size, that is, it cannot grow or shrink in size.
let my_tuple:(i32,f64,bool) = (-34, 45.23, true);
You can access each item of a tuple by referencing the item's index,
- Arrays
Array hold many datavalues, but every items in it must be of the same datatype. It also has a fixed size like tuples.
let my_array = [34,5,6,7];

let my_other_array = ["monday","tuesday","wednesday"];

// this array must contain f64 datatype and must have a lenght of 5
let my_another_array:[f64; 5] = [2.3, 45.5, 56.2, 45.1, 45.6];
Items in a array can be obtained by referencing its index,
Vectors are another compound datatypes in Rust, but they are not primitive datatypes. Vectors are like arrays, in that they only take items of similar types, but they can have a variable size (items can be added or removed).
Functions
Functions in Rust are similar to functions in other programming languages. It is used in executing blocks of code a line at a time. The "main" function is the entrypoint of a rust program, other functions can be called in the main function.
// in your main.rs

fn main() {
    println!("Hello, world!");
    my_new_function();
}

fn my_new_function() {
    println!("I was called, and I am working!");
}
Run "cargo run" in your terminal to build and run the code. The output should be similar to this
 Blocking waiting for file lock on package cache
    Blocking waiting for file lock on package cache
   Compiling my_first_program v0.1.0 (/home/dray/www/Rust/my_first_program)
    Finished dev [unoptimized + debuginfo] target(s) in 37.28s
     Running `target/debug/my_first_program`
Hello, world!
I was called, and I am working!
or run it on this interactive code editor
Functions can also take parameters and these parameters needs to be typed
fn main() {
    my_func_para(34.3, 45);
}

fn my_func_para(para1: f32, para2: u32) {
    println!("First parameter: {}", para1);
    println!("Seconde parameter: {}", para2);
}
On interactive code editor
Functions can also return data. This returned data needs to be typed
fn main() {
    println!("5 multiple by 2: {}", multiply_by_two(5));
    println!("60 divided by 5: {}", divide_by_five(60));
}

// with the return keyword and semicolon
fn multiply_by_two(x: u32) -> u32 {
    return x * 2;
}

// without the return keyword and semicolon
fn divide_by_five(y: u32) -> u32 {
    y / 5
}
On the interactive editor
Loops
Loops are used to run a block of code in a repeated manner. There are three type of loops in Rust: loop, while loop, for loop.
fn main() {
    loop_example();
    while_loop_example();
    for_loop_example();
}

fn loop_example() {
    // create a mutable variable.
    // Variables are immutable by default, so we need to add the mut keyword
    // to make it mutable
    // I will explain the concept of variable mutability and referencing
    // in the next article.
    let mut counter = 0;

    // create a loop
    let result = loop {
        // repeatedly add one to counter
        counter += 1;
        // break out of the loop if counter equals 10
        if counter == 10 {
            break counter;
        }
    };

    println!("The result is {}", result);
}

fn while_loop_example() {
    // create a mutable variable
    let mut counter = 5;

    // while counter is not equal to 0, run the block of code
    while counter != 0 {
        println!("counter is: {}", counter);
        counter -= 1
    }

    // counter is now zero, this will run!
    println!("Counter is empty!");
}

fn for_loop_example() {
    // create an array
    let my_items = [4, 5, 7, 2, 7];

    // loop through all the array items
    for item in my_items {
        println!("for loop item: {}", item);
    }
}
In an interactive code editor
Control flow
Control flow are used to control the condition at which a block of code should execute. In Rust, control flow is done using if and if else statement and else if statement
fn main() {
    if_else_example();
    else_if_example();
}

fn if_else_example() {
    let my_value = 2;

    if my_value > 1 {
        println!("I am greater than {}", my_value);
    } else {
        println!("I am less than {}", my_value);
    }
}

fn else_if_example() {
    let my_value = 4;

    if my_value == 1 {
        println!("Value is 1");
    } else if my_value == 2 {
        println!("Value is 2");
    } else if my_value == 3 {
        println!("Value is 3");
    } else {
        println!("Value is 4");
    }
}
In an interactive code editor
Conclusion
So far, you have setup your environment for Rust programming, installed Rust compiler, and Cargo. You also wrote your first Rust program and got introduced to common programming concepts that Rust has. In the next article, we will explore other programming concept specific to Rust, like variable ownership, Structs, Enums ( and its special types like Options and Result), Traits and so on.
Let's connect on Twitter @drayfocus, and Linkedin Akinola Ayomide.
Cheers!
